


Video Edition: youtu.be/mn22Eu_ELSs
Hi there, this is PART 1 of my NEST.js series. In this chapter we will inspect what controllers are and how they work in NEST.js. In addition we also have a look on Pipes and DTO's, what they are and what happens if you combine them.
Controller? Yeah, I have one for my PlayStation
Just like you use your PlayStation controller to control games, controllers in NEST.js are used to control incoming requests. Controllers play an important part in a backend system. Normally for every endpoint in your system, there is one controller for it. If a route is called, for example http://localhost:3000/users, the UserController is invoked.
@Controller('users')
export  class  UserController {
...
}
We use the @Controller decorator to instruct NEST, this class is a controller. An in the round brackets ('users'), we tell NEST that this controller is responsible for /users endpoint.
Okay, thats nice, but how we can handle the different HTTP Requests?
Well, NEST loves to use decorators, and therefore we have all the HTTP Methods accessible as decorators.
@Get(), @Post(), @Put(), @Delete(), @Patch(), @Options(), and @Head(). In addition, @All() defines an endpoint that handles all of them. This is nice, because we simply put them above the functions and it works. This looks nice and clean and is easy to understand.
@Controller('users')
export  class  UserController {

// i am handling the GET Request
@Get()
getAllUsers(): User[] {
...
}

// i am handling the POST Request
@Post()
insertUsert(): void {
...
}

// i am handling the PUTRequest
@Post()
updateUser(): void {
...
}
Parameter Handling in Requests
Often you pass parameters in your HTTP Requests to transport additional information. Lets go through the most common use cases in an API backend, to demonstrate, how you can access them.
I want to to have two endpoints, one for get all users and one to get a specific user
@Controller('users')
export  class  UserController {

// i am handling the GET Request for getting all users
// localhost:3000/users
@Get()
getAllUsers(): User[] {
...
}

// i am handling the GET Request for getting a specific user
// localhost:3000/users/xamhans
@Get(':username')
getSpecificUser(@Param('username') username):
    console.log(username) <---- 'xamhans'
}
Nothing easier than that. First we keep our function getAllUsers() and add a second function getSpecificUser() with @Get(':username'). In addition we use the @Param('username') decorator in our getSpecificUser() Function to access that specific route parameter. To make things clear, you can choose any name you want, but make sure it's the same name in @Get() and the @Param decorator.
I want to access the body of a POST/PUT Request, so I can insert/update a new user
@Post()
insertUser(@Body() newUser) {
    console.log(newUser) <--- '{name: 'xamhans'}
}

@Put()
updateUser(@Body() updatedUser) {
    console.log(updatedUser) <--- '{name: 'xamhans_reloaded'}
}
We use the @Body() decorator in both functions to access the Body Payload. Pretty straightforward.
I want to access the query parameters, so i can filter my users
// http://localhost:3000/users?search=hans&limit=5
@Get()
findAll(@Query() query) {
    return  `Search for all users with name ${query.search} with         limit ${query.limit}`;
 // Search for all users with name hans with limit 5
}
We use the @Query() decorator as an paramter in the findAll() Function to achieve this.
With this knowledge, you should be cover the most use cases for an API Backend (i hope, please write me if i forgot something 😇 )
Input validation, make your controllers robust

Have you ever noticed the pain, if a colleague or a customer called your backend with parameters or data that you never ever thought of ?
Here is a concrete use case, imagine we want to create a new user in our database. We configured our users database table in that way, that the username should be at least 3 characters long. Somehow the customer has managed to get past the frontend validation process and send a post request with a 2 character username. Guess what will happen ? 💣 Our controller accepts the request and call the database service with the payload, our service then tries to insert a new user with the not valid username and here the system will break.
To prevent this, we make sure that the controller validates the data before proceeding.
Validation with Pipes and DTO's
Before we start, lets make sure that we have a common understanding in terms of Pipes and DTO.
Pipes have two typical use cases:
- transformation: transform input data to the desired form (e.g., from string to integer)
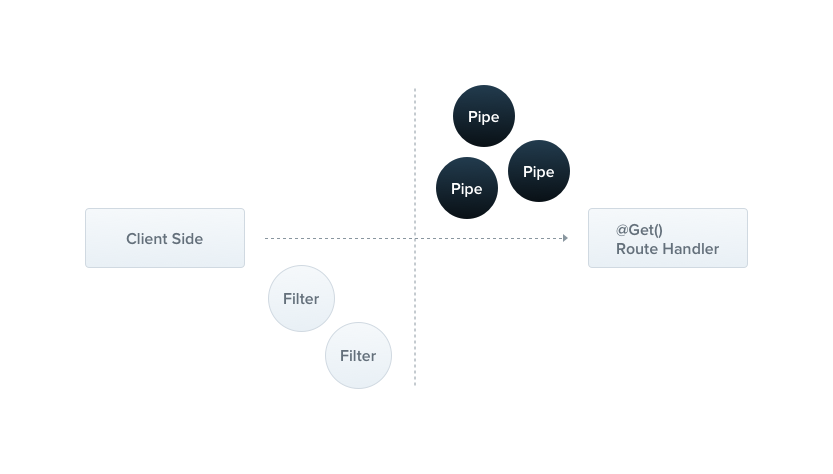
- validation: evaluate input data and if valid, simply pass it through unchanged; otherwise, throw an exception when the data is incorrect. Nest interposes a pipe just before a method is invoked, and the pipe receives the arguments destined for the method and operates on them. Any transformation or validation operation takes place at that time, after which the route handler is invoked with any (potentially) transformed arguments.
DTO stands for Data Transfer Object. With a DTO we define how we want to receive and send data.
export class CreateUserDTO{
  username: string;
}
For our create user usecase, we create the CreateUserDTO with the properties that the user object should contain.
Okay thats nice, but how we define that username should be at least 3 characters long?
Here we need a little help from another libraries called class-validator & class transformer
npm i --save class-validator class-transformer
class-validator offers you a lot of decorators that you can use for validation, so lets start by defining the username property to be mandatory (@IsNotEmpty()) and a min length of 3 characters (@MinLength(3)) .
Explore all the class-validator decorators [here] (github.com/typestack/class-validator) that you can use for validation.
import { MinLength, IsNotEmpty } from 'class-validator';

export class CreateUserDTO{
  @MinLength(3)
  @IsNotEmpty()
  username: string;
}
Now it all comes together: Pipes + DTO's = ❤️
import { Body,Controller,Post,UsePipes,ValidationPipe} from  '@nestjs/common';
import { CreateUserDTO } from  './createUserDto';
@Post()
@UsePipes(new ValidationPipe({ transform: true }))
insertUser(@Body() createUser: CreateUserDTO) {
console.log(createUser)
}
Payloads coming in over the network are plain JavaScript objects. The ValidationPipe can automatically transform payloads to be objects typed according to their DTO classes. To enable auto-transformation, set transform to true. This can be done at a method level or globally. Therefore set the option on a global pipe in the main.ts
app.useGlobalPipes(
  new ValidationPipe({
    transform: true,
  }),
);
So lets call the users endpoint and see what happens
 Here we call the users endpoint with a not valid username, and it is returning a error message that the property "username must be longer than or equal to 3 characters". This is awesome, the reciever of the response will exactly know what is not correct and can adjust the request.
 Here we send a valid payload to the endpoint. As you can see that the response returned a 201 created code. Also the code inside the function was executed.
Lessons learned
- Controllers play an important part in a backend system, because they are responsible for manage / routing the incoming requests
- Use
@Query()to access query params,@Param()to access route params, and@Body()for body payload of a POST/PUT request - We use Pipes in NEST to transform or validate data
- With DTO we define a contract how a object should look like and what requirements it has (this goes for both directions, how the request data must be look like and the response data)
- With class-validator libary we have a lot of decorators that we can use for defining the DTO's